Showing posts with label real life. Show all posts

Thursday, September 5, 2013

Let's Pretend ...


My last post was on November 14, 2012 entitled, "Let's Pretend it is Fall."  Well, let's pretend I didn't just take almost a year off from blogging. The truth is I did. Now I'm missing it.

seashells and japanese fishing floats on my great grandaddy's table. thank you Miss Shutterbug for the basket!
it is coastal casual, vintage, my signature color and one of the only pretty things completed in our New New house

Hunky Husband showing off his handy
work. He closed in the opening to a formal
living room (framing, drywall, build closet,
move electrical,texture walls, install doors,
 install molding, install ceiling fan & paint)
to create a 4th bedroom. CHA CHING!
While I was gone, Hunky Husband and I found a great deal on a foreclosure just two neighborhoods down from the rental house. We renovated in four weeks changing almost every surface in the place -- took down popcorn ceilings, painted every wall, laid hardwood in almost every room, and repainted the kitchen cabinets.  We also took a formal living room area (as if that would ever happen for our family) and turned it into a fourth bedroom.

I will have some before & afters to come, but right now there are lots of before & durings.


Through all the drywall dust and late nights, I discovered what a superhero HH really is.  He did all the work himself (I painted and did all the Girlie wrangling) and it turned out amazing.


It was telling that during this process, I was super excited about our vision for the NewNew house, but not interested at all so much about staging. I never once thought to take pictures of the depersonalization I did in our rental house. It did not even blip on my radar screen to build my portfolio with before and after pix of the Girlie bedrooms.

It never penetrated my NewNew house induced euphoria when the realty company sent 3 perspective couples to view the property ON OUR MOVING DAY. Yup, you read that right. Moving truck in the yard, they were touring around our cardboard boxes and trying to help them "imagine the space" and "appreciate the great elementary school."

when all the staging is done and the packing begins,
sometimes you just have to take the biggest box and make a girlie castle

So, maybe I should change this whole blog to talk about our NewNew House (another story for another day) and my girls and HH and our life. Except for the fact that without working on this blog at all for almost a year, it has gotten 700-900 page views per month. Without me begging my mom and everyone from high school to click on it, people have come looking for the information that I put here long, long ago in a galaxy far, far away.

It is more telling that during this major transformation of our new space, I really did clean and stage the rental house for potential next renters to see. My friends assured me that in a military town, close to the base, at a good price, at the beginning of the summer, blah, blah... our property would rent no matter what shape it was in. I just couldn't imaging letting it roll like that.

This is what I do, this is who I am...I am a stager!


there were lots of late nights on bare concrete floors

So, I think I will finish the last post in the series on the five most adorable things to undo in your house. Nine months in the making -- worse than waiting for the new season of Walking Dead.


I will share some of the insights I got from being a renter showing a house to perspective next renters.  I will try to get some clients to let me post before and after staging photos of their listed properties. I'm looking into taking a certification class for staging so that I can have a very official looking logo to go along with all my fabulousness.


white kitchen cabinet doors coming soon!
I will prolly talk a lot about my NewNew house and all the Pinteresting projects that finish off the place.  We are still in cardboard in two rooms, but getting ready for the big reveal. Que fast forward music from "Trading Spaces."  Bring in the cute, tall twins from Property Brothers to talk about all the improvements.

I will try to make sure that every post from now on is not nearly as populated with the word "I".  Most importantly, I'm going to keep trying to help you live in your show house now by getting a little more VisitReady every day.

just bec

Wednesday, November 14, 2012

Let's Pretend it is Fall

For those of you who are enduring, enjoying cold and snow already, I salute you. I do not know how to handle an actual change of seasons, as I have lived my entire life in places devoid of them. Well, in SC we have deer, turkey, dove, duck.  My Sistah adds football, but that is more of a religion.

However, I am a holiday mom.  Even if the palm trees are still green & we are all wearing flip-flops, I try to give my girls lots of festive memories. This year, we went to a corn maze, two different Halloween carnivals, trunk-or-treat at the church and THEN trick-or-treats with a ton of friends.

Working in retail for 8 years, this is the point at which I used to immediately switch over to Christmas.  At Target, we stayed over night on Halloween to switch the entire store over to fa la la la la fabulous. Last year my family came to visit from SC for Thanksgiving. We switched from Summer straight to Christmas as soon as supper was off the table -- gotta burn off that fried turkey somehow.

Enter my new friend (and business partner) Miss Honey I'm Home. She LOVES fall. Coming from Minnesota, she is familiar with all the seasons -- apparently there are four.  She also designs front porch installations for general curb appeal or special occasions.  My front porch needed some love to say the least. It needed her vision. It also helped that inspiration struck her about the same time Fall decor went 80% off at Hobby Lobby. That is what I am talking about!
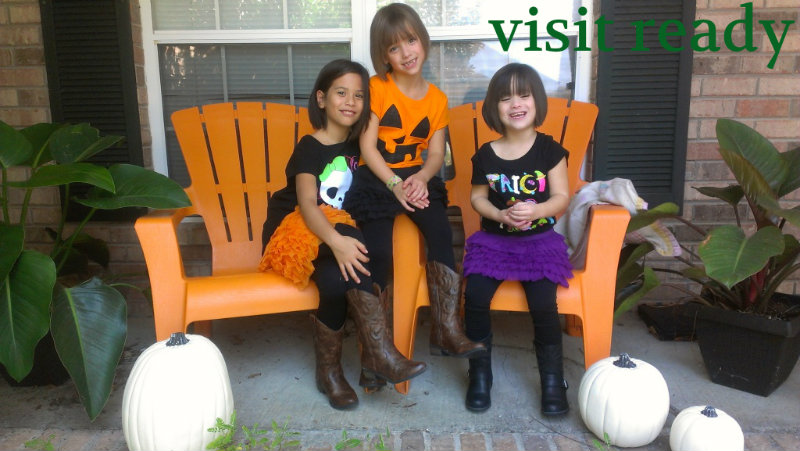
Nothing says Halloween like white pumpkins,glitter t-shirts, tutu skirts and cowgirl boots.

I bought these orange chairs from Home Depot because I thought they scream "Summer Fun." Luckily for me, they also scream "Happy Halloween." Now I am hoping to soften them up a bit and let them suggest "Give Thanks." Don't worry, they have nothing to say about Christmas -- they will be heading to the garage.


via HomeDepot.com
My creepy/classy Halloween feather wreath is perfectly me. Unfortunately, it let us know just how dark my entryway is. From the street, you couldn't see it at all.  Even changing over to this bright orange berry number didn't brighten it up. Hunky Husband to the rescue with a dusk to dawn spotlight that we could point directly at all this fake fall fun.
The wreaths at Hobby Lobby started at $129 -- I am not that girl. Even at 80% off, we could do better.  I got two garlands for $10 (started at $49) and a $5.99 base grape vine wreath.  (Do not tell my Sainted Mother that I bought a grape vine wreath in a store).  One garland broke down into these big sprigs that went right onto the wreath.  The other I broke down into smaller pieces to add to the pumpkin tower.

The Butlers via Pinterest
This is the pin that started me on white pumpkins in the first place. The top two came from Michael's 50% off sale at the beginning of the the season. The bottom one came from Target 50% off after Halloween. Even with the discounts, $24 is a lot for me to spend, but I plan on using them every Halloween and Thanksgiving for the rest of my life.

-So, I've that going for me.

That created a problem when I went to build the tower.  I didn't want to damage the pumpkins with pins or hot glue.  I need to use them for Halloween next year and I do not think HH would give me the space in his man land garage to store this piece whole. I poked a few strategic holes in the bottom of the little one and removed the stem from the big one. I used wood BBQ skewers to secure the top two in place -- all small holes & a cookie to anyone who can find them next year.

I hope you are having fun getting your place all tarted up for the holidays. I'm hoping to get some good before & after shots of an upcoming staging job for you next time.

Whether you are getting ready for the holidays or your open house, you can stretch those curb appeal dollars to make your place more Visit Ready.

just bec


I'll be linking up at these linky parties:


before & after party @ thrifty decor chick nifty thrifty tuesday @ coastal charm show me what you've got @ our delightful home  tuesday to do @ the blackberry vine get your craft on @ today's creative blog tip me tuesday @ tip junkie  tutorials & tips @ home stories a to z  take a look tuesday @ sugar bee crafts  one project at a time @ a bowl full of lemons  tuesdays treasures @ my uncommon slice of suburbia  wow me wednesday @ ginger snap crafts   tuesday time out @ reason to skip the housework  sugar & spice @ 733 a creative blog  whatever goes wednesday @ someday crafts show & share @ southern lovely wow me wednesday @ polka dots on parade  under $100 @ beyond the picket fence  show off your stuff @ fireflies and jelly beans  pinspirational thursday @ the artsy girl connection   hooking up with hoh @ house of hepworths  strut your stuff @ somewhat simple    share awesomeness thursdays @ the 36th avenue  a glimpse inside @ catch a glimpse   feathered nest friday @ french country cottage  freestyle friday @ happy hour projects  thursday temptation @ two yellow birds decor   flaunt it friday @ chic on a shoestring  the pity party @ 30 handmade days  weekend wrap up @ tatertots and jello anything goes link party @ bacon time  friday free for all @ five days five ways  frugal friday @ the shabbby nest  mad skills party @ mad in crafts  serenity saturday @ serenity you   manic monday @ serendipity and spice


Tuesday, July 31, 2012

Disney Deals and Crafty Steals

One last go-round for the bandanna shirts we made
 for Easter ($2.50 each).
There are few things I love more than clearance sales, Disney World is one of them. So, I have combined the two in planning our family vacation this year. These are a few of the tips & fun projects we did to make this trip thrifty and extra princess-y.

By far, my best saving tip, pre-purchase the CD of professional Disney photos.  This deal saves $50!

Our last trip, I did not take advantage of the PhotoPass because I thought it was too expensive. I am not much of a photographer and that whole trip, we never got one shot of all of us together. It was a great trip, but no pix to prove it. I know it sounds cheesy, but these posed shots in front of castles and my girls hugging princesses are priceless to me.

They also include stock photos of the characters alone.  We plan to use them for future projects.

 After the vacation, when I went to order the CD to be shipped, they had a savings offer that covered my shipping.  You can also just digital download during that step as well.


The matching Girlies' outfits came from our favorite web sites (Old Navy, Target & Gymboree). Once things go on clearance in the store, it is hard to find all 3 sizes in matching colors. Online, is a clearing house for all the items and we have a better chance of getting full sets.  The matching is not something I like in real life, but it was helpful in the crowds of the Magic Kingdom.

mister fan via CouponingtoDisney
In the park, there are giant fans attached to water bottles. They prolly do cool you off, but they are larger than any of my tiny Girlies and retail for $437 each -- well, maybe not that much, but more than this thrifty momma was ready to pay. Couponing to Disney said to avoid the misting fan from Wal-Mart because it leaks. I wanted to avoid it because I didn't want to deal with extra water at all. We found tiny battery powered fans at Wal-Mart for $1.50 each. The blades are made of foam, which is important because my children love to try and lose fingers whenever possible. I used Minnie Mouse ribbon to make lanyards. Each Girlie got to carry her own cooling system (and drive her sister a little crazy) while waiting in line.


My address says we are Florida residents and that got us a pretty nice discount on park tickets. However, Pensacola is as far away from Disney as Charleston, SC. So, we ended up spending just as long in the car.  I needed some road trip solutions.

I stole this idea from less than perfect life of bliss and Disney-fied it just a little. These clothes pin tabs go up on the visor. As long as you are sweet & quiet, they stay up.  If you are bad, yours comes down. When we stop for gas, only the Girlies with tabs up get a treat.  All my Girlies are color code junkies, so we didn't even need names or initials. I made these in about 2 minutes using Paint -- flashback to 1993.  One big colored circle + one smaller white circle + one black circle + two smaller black circles = quiet tabs.You could use a circle punch to make them perfect, but my Middle Girlie cut these out, so they are beautiful to me.

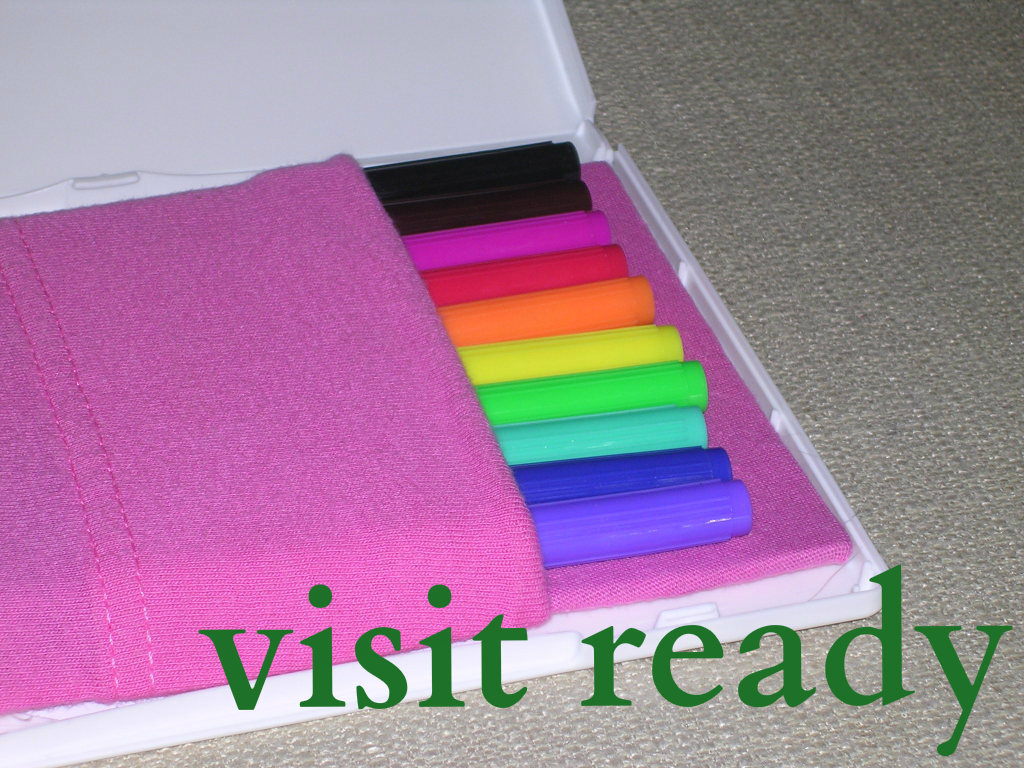
Classy Clutter made some super cute DVD boxes into colored pencil holders.  We had some Disney movies and Wii game boxes floating around so I didn't even have to make new covers. I followed her directions for removing the disk holder section of the box. Dollar Tree had a pack of 21 thin markers (7 each was plenty). Luckily, I had some pillow cases left over from a previous project. They were made from that stretchy T-shirt material. It made them perfect holders because they were already hemmed and stretch to let the markers out, then bounce right back.  Road fun for 33 cents each -- awwww yeahhhh!


life size Cars you can climb on &
the headlights even come on at night
the big blue pool makes you feel like you are swimming
with Nemo & music plays under the water while you swim


My last 2 cents: check out the newest value resort, Art of Animation. I cannot say enough good things about it! It is themed Little Mermaid, Finding Nemo, Lion King and Cars. If your children have ever seen a Disney or Pixar movie, they will lose their minds when they see this place. Everything is scaled so you feel like you are in the movies. Even if you can afford to stay in a fancier hotel, this one is amazing!

Now that August is here, we will be heading back to school and I will be working more on houses and blogging. Thanks for coming along with us on all our crafty Disney adventures. Hope you had a lot of your dreams come true this Summer, too.

running out of pixie dust, 
just bec

before & after party @ thrifty decor chick nifty thrifty tuesday @ coastal charm show me what you've got @ our delightful home  tuesday to do @ the blackberry vine tip me tuesday @ tip junkie  tutorials & tips @ home stories a to z  take a look tuesday @ sugar bee crafts  one project at a time@ a bowl full of lemons  tuesdays treasures @ my uncommon slice of suburbia  wow me wednesday @ ginger snap crafts   sugar & spice @ 733 a creative blog  wow me wednesday @ polka dots on parade  under $100 @ beyond the picket fence  show off your stuff @ fireflies and jelly beans  thrifty thursday @ thrifty decorating  pinspirational thursday @ the artsy girl connection  thrifty thursday @ tales from bloggeritaville  hooking up with hoh @ house of hepworths  strut your stuff @ somewhat simple  crafty, scrappy, happy me @ crafty, scrappy, happy  share awesomeness thursdays @ the 36th avenue  get your brag on @ gluesticks  a glimpse inside @ catch a glimpse   feathered nest friday @ french country cottage  freestyle friday @ happy hour projects  thursday temptation @ two yellow birds decor  from scratch friday @ marriage from scratch  feature yourself friday @ fingerprints on the fridge  flaunt it friday @ chic on a shoestring  the pity party @ 30 handmade days  weekend wrap up @ tatertots and jello anything goes link party @ bacon time  friday free for all @ five days five ways  frugal friday @ the shabbby nest  mad skills party @ mad in crafts  serenity saturday @ serenity you   manic monday @ serendipity and spice


Friday, July 20, 2012

TuTus for Tomboy Princesses

My girlies are full on Disney Princess junkies. They each have their own favorite princess. They will tear up the dollar section at Target whenever they see something pink.  However, they are also going to climb and run and jump and scratch and spit.  Then, they will spill something yummy all over whatever Princess gear they are wearing.  

On our family trip to Disney, we finally booked the character dinner in Cinderella's castle. Baby Girlie is old enough to enjoy & remember it. Big Girlie is in that last five minutes of Princess before she starts chasing boys and hating family vacations. Perfect timing for overpriced chicken nuggets and hugs from Belle, Ariel, Aurora & Cinderella! It was totally worth it -- the adult food is amazing and the personal attention from the cast members was incredible.

On previous visits we had seen lots of little girls in the long (polyester) princess costumes. My girls would not wear those hot little numbers to Princesses on Ice, much less Central Florida in June. I wanted something just as cute and trademarked, but way more comfortable.

Solution: T-shirts & TUTU skirts!!!!

I scouted through a few of the million tutu tutorials. For the tulle, we went with Rapunzel's hair, Belle's dress, Snow White's skirt yellow. The bike shorts from Gymboree determined the length.

While waiting for the tulle to go on sale at Hobby Lobby (when roll ribbon is on sale), I found IdeaRibbon.com, a wholesale company that is even cheaper than any craft box store's coupon or sale price.  They have much longer rolls (300' long instead of 100') -- I made all three skirts with one roll.

this is my highly technical way to measure the strips quickly for two different size skirts.  from the edge of the table to the first line of painter's tape - little girlie skirt.  from the edge of the table to the second line of painter's tape - big girlie skirts. repeat 40-50 times per skirt or till you run out of tule.
sorry about the excellent shot of my hooters and fat roll -- that is what I get for giving hunky husband the camera.
I liked the look of slip knots because we were using yellow and needed the coverage over the elastic band.  I was also worried that double knots would poke them in the back while riding rides.  There is no way to ask a child that or test it without putting the idea in their head that it is uncomfortable. I still hate that email telling me there is no good place in my mouth for my tongue.


So, the slip knots are prettier, but not as secure. I refused to spend my day in the Magic Kingdom fussing over them. Necessity is the mother of invention. So, we pulled in a whole roll of tiny yellow ribbon. One tight knot at the base of the slip knot was enough to secure it, but too tiny to feel. They held up great from Its A Small World, to the spinning tea cups, all the way to dinner at Cinderella's Royal Table.


The t-shirts were the standard little girl shirts with cap sleeves, $3.47 on the table displays at Wal-Mart. We added iron-ons of our favorite princesses. These are from UltimateTransfers on Ebay.  She was so fast in shipping them and even replaced one that was damaged in our broken mailbox.  I just love great customer service from cyberspace!


I've spent so much time trolling thrifty Disney sites, I just figured everyone would be decked out in matching t-shirts created on Silhouette and homemade over-the-top hair bows. Apparently, the Pinterest revolution is strong, but some people really do just wear regular clothes to the park. We got lots of looks, several complements, a couple of "where did you get those?", and (my favorite) two moms saying, "I'll make you one when we get home!"

Cinderella asked my Middle Girlie, "Is that your Fairy Godmother?" 
"That's just my Mom."  
"Well, she gets you out of all kinds of trouble and I know she made you that dress!" 
BEST COMPLIMENT EVER!!

bibbidi bobbidi boo,
just bec

i sometimes link up at these great parties:


before & after party @ thrifty decor chick nifty thrifty tuesday @ coastal charm show me what you've got @ our delightful home  tuesday to do @ the blackberry vine tip me tuesday @ tip junkie  tutorials & tips @ home stories a to z  take a look tuesday @ sugar bee crafts  one project at a time@ a bowl full of lemons  tuesdays treasures @ my uncommon slice of suburbia  wow me wednesday @ ginger snap crafts   sugar & spice @ 733 a creative blog  wow me wednesday @ polka dots on parade  under $100 @ beyond the picket fence  show off your stuff @ fireflies and jelly beans  thrifty thursday @ thrifty decorating  pinspirational thursday @ the artsy girl connection  thrifty thursday @ tales from bloggeritaville  hooking up with hoh @ house of hepworths  strut your stuff @ somewhat simple  crafty, scrappy, happy me @ crafty, scrappy, happy  share awesomeness thursdays @ the 36th avenue  get your brag on @ gluesticks  a glimpse inside @ catch a glimpse   feathered nest friday @ french country cottage  freestyle friday @ happy hour projects  thursday temptation @ two yellow birds decor  from scratch friday @ marriage from scratch  feature yourself friday @ fingerprints on the fridge  flaunt it friday @ chic on a shoestring  the pity party @ 30 handmade days  weekend wrap up @ tatertots and jello anything goes link party @ bacon time  friday free for all @ five days five ways  frugal friday @ the shabbby nest  mad skills party @ mad in crafts  serenity saturday @ serenity you   manic monday @ serendipity and spice

Saturday, July 14, 2012

Deciding to Stop Quitting

My family had a wonderful time on our Disney Vacation. I made lots of Pinterest inspired crafts and outfits to make the trip extra Princess-y. Maybe I will blog about a couple of them.


I used that as an excuse for not blogging.  In truth, I do get obsessed with whatever I am focused on at the time.


Therein lies the problem. When I first started blogging this January, I got sucked right in. Every day I was reading blogs, writing my own blog, planning blogs, doing projects for my blog, shopping for future blogs, posting on Facebook about my latest blog... well, you get the idea. It is easy to see why blog became a cuss word around my house pretty quickly.

via Pinterest


Maybe it is because I am a Capricorn or an overachiever or a total mixed bag of nuts, but I have never been good at balance.  My house was a wreck (except for the part I needed to photograph). My girlies were eating a lot of Ramen noodles for dinner. My laundry baskets were stacked to the bajesus! My Hunky Husband was super supportive, but silently hating this whole thing. My parents came to visit from another time zone and I had them babysit while I made a pillow. NOT COOL.  So, I let the pendulum swing all the way to never blogging.

While I was gone, my little site got 10,000 views. Happy Dance Time!  In blog world that isn't really amazing (Thrifty Decor Chic does 40 gazillion a day).  For a new baby blogger that is a big deal and I'm sad because I missed it -- there was no happy dance.  However, I don't want to miss all the girlie, friend, husband & family happy dance moments because I'm too busy checking my blogger stats.

So now, I take the next turn in the road -- to blog with balance. At least enough balance that it works for my family. We are all a little weirdo around here.

finding my new normal,
just bec

Thursday, February 16, 2012

We Bring Order to Chaos


My friends Manisha, Heather & Suzanne proved that cheerleaders are not dumb.  In high school, they cheered, but they were also in:  National Honor Society, Beta Club, Yearbook  Staff, Mu Alpha Theta, and about 50 other activities while making straight A's.  GO GREENWAVE!  I was not a cheerleader (believe me, nobody wanted to see me in one of those little skirts), but I often use "Cheerleader Honor Graduate" to describe my personality.

Everyone who ever worked with me in retail will tell you it is true.  I loved the numbers, stats and systems --geeky.  Once I pulled reports for the week, month, district, YTD or comp it always ended up translated into a brightly colored bulletin board --rah rah!  I love my lable maker -- order. Everything has to be color coded -- pretty.  Most of the major problems of my life have first been addressed with a trip to the post-it, highlighter, colored thumbtack area of Office Depot.

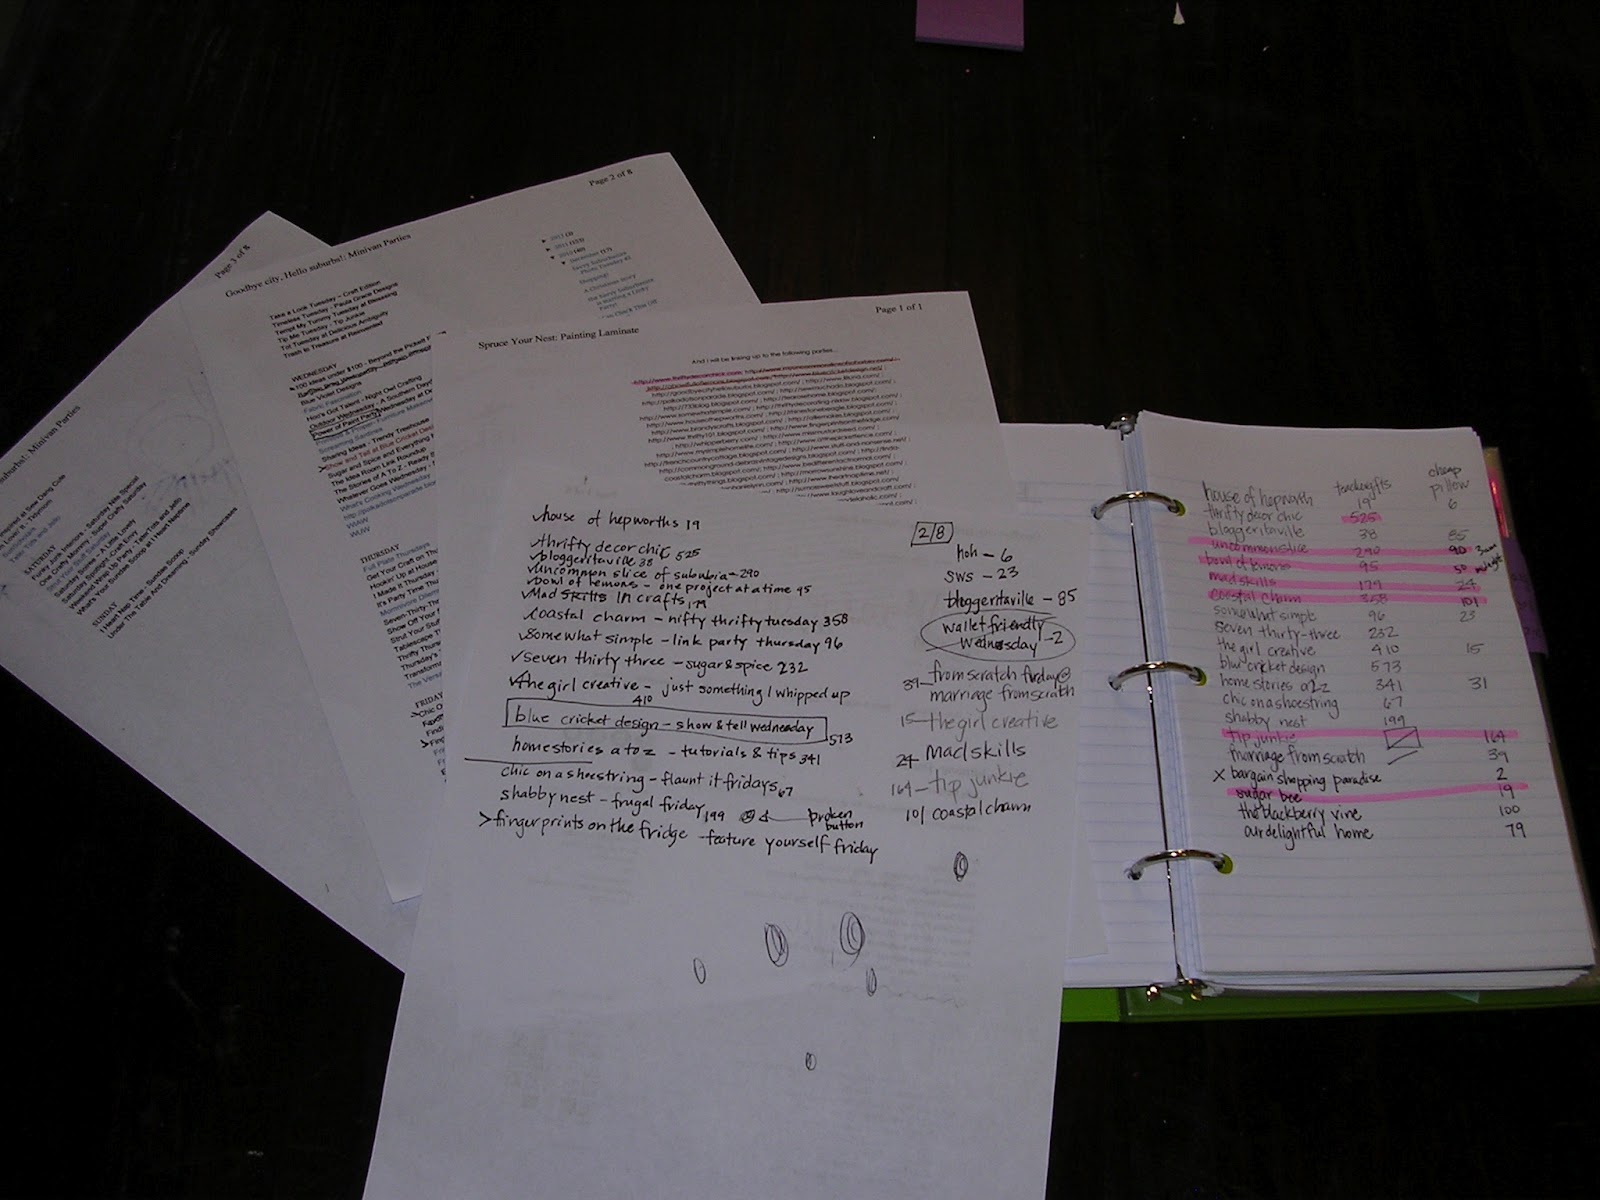
lists of lists was not helping keep linky land in order

Somehow, I thought blogging would be different.  With all the typing and clicking, I just assumed that the structure would be digital.  As I started trying to link up to all your wonderful linky parties, I realized that I would in fact need to impose some brightly colored order to my digital life.

little birdie secrets via pinterest


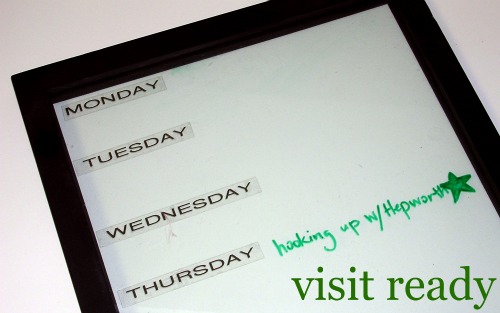
I had already used this Pinterest idea to make a picture frame as a dry erase board. However, there are a lot of parties on Monday and that day alone was taking up the whole frame. I also needed more detail than I could get with the fat dry erase marker. I also needed some of my info to stay put while part of it needed to be erased.

via pinterest


I found this Pinterest idea using an old window frame and paint chips.  I do love me some paint chips.


It lead me to my final board, using a poster frame.  I think the last time I bought one of these it was for a picture of Kirk Cameron.  Each day has its own color of mini post-it notes. On each post-it I can include the name of the site, the name of the party, the day & time they usually post the party. 

All that info stays pretty constant and I do not want to have to rewrite it every week.  So it goes under the plastic -- then I don't loose any of those little notes either.  It also prevents short people at my house from trying to rearrage them.

Then, on top of the plastic I can keep track of two different projects that I am posting all over linky land.  I list what number my project is posted in each party. 

The first week, when I was just sticking my big toe in the water, most of my posts were in the 400 - 500 range.  As I got better at tracking when parties were opened, my latest project is posting in the top 20 or so.  That does make a big difference in how much traffic I've been getting.

Like I said, there are a lot of parties on Monday, the rest of the week, I ended up with a huge empty space on my board.  It is the perfect place for my floating to do list (in purple).  As my ideas go from project, to photos, to writing, to linking, I can move them around on top of the plastic. 

You'll prolly use this idea for some other need, but at least 700 of you also keep track of when to Hook up with HoH. It works great for calendars.  Any time you have to keep some info and wipe away the rest, keep this idea in mind.  When you are checking out all those linky parties, keep an eye out for me. or drop by and  follow visit ready. or like me on facebook. or leave a comment.

i'll be your best friend,

just bec


i'm checking "my blogs" every five minutes while i write this, because two parties should be opening soon.

this one is linked up at:

one project at a time @ a bowl full of lemons  hookin up with hoh @ house of hepworths  100 ideas under $100 @ beyond the picket fence  thrifty thursdays @ tales from bloggeritaville  manic monday @ serendipity and spice  just something i whipped up @ the girl creative  mad skills party @ mad in crafts  show me what you got @ our delightful home  tuesday to do @ the blackberry vine  tuesday's treasures @ my uncommon slice of suburbia  tutorials & tips @ home stories a2z  wild wednesday @ chatty chics  wow me wednesday @ ginger snap crafts 

Sunday, February 12, 2012

Quick Sew Pillow


If you do not sew much, if you do not sew well, if you have never sewn before, you can sew this pillow.  Envelope pillows are my fav-or-ite (you have to sing it in a high voice).  They are:
  • easy to plan
  • easy to sew -- only 2 straight seams
  • easy to clean -- whip them off and throw in the wash
  • easy to change -- slip them off and put that form in another envelope pillow case
You start with your high quality, high priced, precious fabric.  I started with one of Hunky Husband's used drop cloths.  Even if you had to buy a new one from Home Depot, they are pretty cheap -- 5-3/4 ft. x 8-3/4 ft for $10.98.  If you've been shopping for material lately, you know that is a good deal.  I just thought free would be an even better deal. 

I also wanted one that had paint splatters on it. I thought it would add to my design. The problem is, that HH is such a left-brained, good painter, even his paint splotches were in straight lines.  He didn't understand the aged, perfectly imperfect aesthetic I was going for.  He asked at least nine times, "do you want the one with no paint on it?"

yes, my driveway is always covered in pink chalk

Some of you have beautiful sewing/craft rooms.  I went out to the driveway to lay this one out with a drywall t-square.  Whatever, it is a drop cloth after all.
I knew I was going to use the inserts from the couch matchy pillows.  I used their measurement for the finished size + 2 inches (1 inch seam allowance on either side).  The other great thing about using drop cloths is that they are hemmed.  For those of us who sew little or not that well, that is a BO-NUS. 

Just start at the hemmed edge and mark off the width of the pillow you want (finished + 2") , making a long strip.  The strip needs to be the length of  double the finished size of the pillow + 6 inches.  That allows the flaps to over lap without gapping open and showing your pillow form.  You do not need to add in seam allowance on this side, because there are just folds on either end.


If you sew often, you know we are about to talk about right side, wrong side.  If you do not sew often/well, pay very close attention to the hemmed edge. When the strip is laid out flat, the pretty side of the hem should be up. When you fold that flap in, the pretty edge folds in and faces the middle of the fabric.  The ugly side of the hem should be facing you now.


Then fold in the raggedy end so that it overlaps by about 6 inches.   Try to put them sort of equal distance from the edge with about a 6 inch overlap.  Now you know why I do not bake, measuring is always a kinda/sorta proposition for me.  From end to end, this fabric burrito should be the width of your finished pillow.  Now pin the rough edges and take to the sewing machine. 

Use the straight stitch and make sure you seal the edges with a little back stitching at the beginning  and the end.  I also back stich over the part where the hemmed edge meets the new seam.  Pillows (at least at my house) take a lot of abuse.  That whole -stitch in time saves nine thing makes a lot of sense around here.

Because I do not sew often/well, I have to take another step.  My scissors are kitchen shears that I use to cut everything.  So, they don't cut anything very well.  My cut edges often look like I made them with my teeth.  The seam allowance guide on the sewing machine is based on the idea that you will have straight cuts.  I use painters tape (green in this photo) to mark a straight edge on the sitch side to guide by.
do not ask why I am wearing sunglasses
 on my head at night


Then, it really is just two straight lines.  It takes about 20 minutes to lay out the pillow and pin (depending on math ability, pinning ability & amount of "help" from short people).  It takes about 2 minutes to do all the sewing.  Really.

The other good thing about envelope pillows, when you flip them inside-out the corners come out very pointy with no work.  There is no extra fabric inside, just enough to make a crispy, not bulky corner. 

I used a very curvy design that needed to be pinned down before tracing it onto the fabric.  You can read about the design here. You could use iron on, stenciled or free-hand designs here.


Before starting on the pillow, I tested Sharpie fabric marker, Sharpie magnum marker and craft paint to see which one I liked better.  The magnum had the translucent, aged, perfectly imperfect look I was going for.  Once again, Hunky Husband did not get it.  He kept asking if I wanted a "better" marker.


Once it is all colored in, I think it is beautiful.  It did take each of my three girlies asking me 140 times each "Whatcha doin?"  I hate Phineas and Ferb, but I love my girlies. 

pretty good free, 1 hour project

supplies needed for this project: cloth, ampersand design, sharpie marker & red wine


making a pillow, making a pillow, making a pillow, making a pillow, that's what I'm doing


Hope you love this project and do a few of your own to make your home more visit ready.  I promise I'll shut up about pillows for a while. 

just bec

i just want to thank the great ladies who host all our linky land fun.  they bring together ideas and inspiration. please check out their blogs as well as these weekly parties.
IhookedupwithHoHlamespice
linked up at:
hookin up with hoh@  house of hepworths before 7 after party @ thrifty decor chick 100 ideas under $100 @  beyond the picket fence thrifty thursday @  tales from bloggeritaville frugal friday @  the shabby nest from scratch friday @  marriage from scratch flaunt it friday @   chic on a shoestring just something i whipped up @ the girl creative mad skills party @  mad in craft nifty thrifty tuesday @  coastal charm home made projects @  tip junkie tuesday to do @  the blackberry vine tutorials & tips @ home stories a2z take a look tuesday @ sugar bee crafts one project at a time @  a bowl full of lemons manic monday @ serendipity and spice tuesday's treasures @ my uncommon slice of suburbia serenity saturday @  serenity you sugar and spice @ 733 a creative blog show and tell @ blue cricket design wow me whednesday @ polka dots on parade need inspiration? wild wednesday @ chatty chic wow me wednesday @ ginger snap crafts crafty, scrappy happy me @ crafty, scrappy happy catch a glimpse @  a glimpse inside thursday temptation @ two yellow birds decorget your brag on @  gluesticks show off your stuff @ fireflies and jellybeans sticker time & party time @  the 36th avenuethrifty thursday @ thrifty decorating pinspirational thursday  the artsy girl connection the pity party @ 30 handmade days  feathered nest friday @ french country cottage  freestyle friday @ happy hour projects  show and tell friday @ my romantic home  friday free for all @ five days, five ways my homemade year @ blissful and domestic  the anything goes linky party @ bacon time  weekend wrap-up @ tatertots and jello  sass' sunday salvation show @ sassafrass salvation pinspired, rewired, stencil party @ the gunny sack we did it wednesday @ sew much ado